Showing posts with label ICT. Show all posts

Saturday, 18 May 2013

Why all our kids should be taught how to code


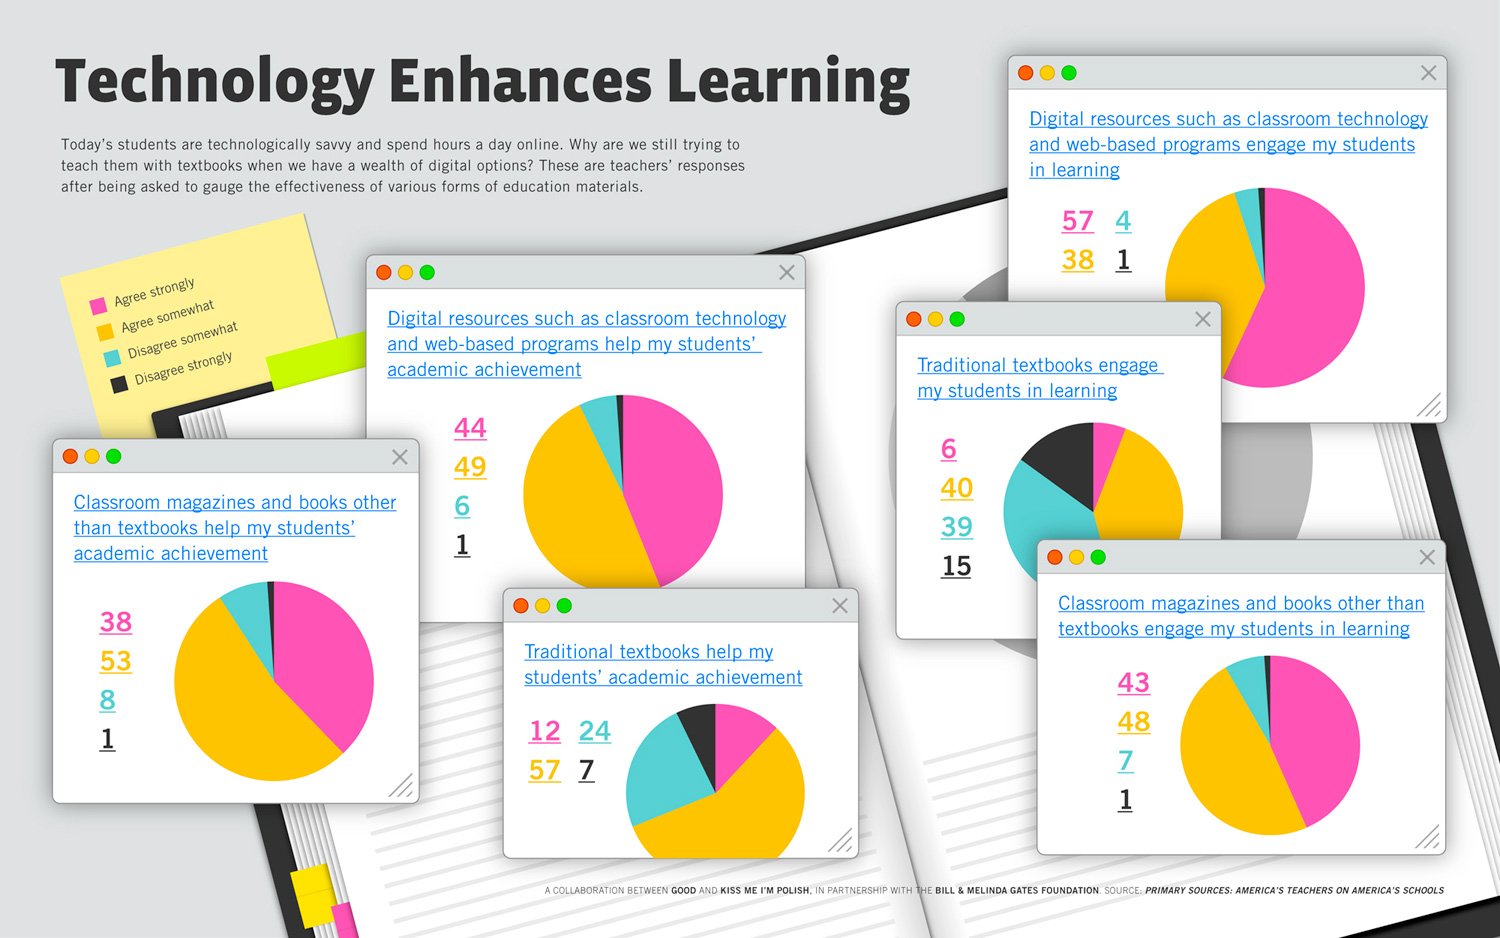
Why all our kids should be taught how to code another Guardian article calling on the powers that be to  invest in our kids futures.

Friday, 12 October 2012

MIT App Inventor


Originally a Google Project, MIT App Inventor allows to you to create on Android based handheld devices. MIT, the makers of Scratch are now managing the project and offering loads of support to would be App developers.

The App Inventor offers a natural progression from the Scratch programming environment as it offers a similar colour coded 'drap-and-drop' coding solution. 

It all online with no downloadable moving parts and if your used to Scratch and programming concepts, its very easy to pickup!

I recently created an App that translated English to Igbo, which was nice...


Beginners Interactive Games Workshop

Changing COstume in Scratch


1. I recently completed a series of "Introduction to Programming workshops with FE college tutors. We used Scratch, the fun code writing environment for creating interactive programs! 


Animation Loop Cycle code


2. Participants followed a set of simple exercises, building on their knowledge as they went along.  By the end of the first session, participants were able to create a sophisticated interactive game.


Shark Eats Fish Score

3. During the following weeks, we looked at more advanced interactive designs and how to introduce Scratch and programming concepts into the classroom. 

 The first Session Outline:

1. What is Scratch?
2. Understanding the Interface
3. Exercises
4. Short Game Exercise
5. Programming Concepts


Workshops are applicable to Primary and secondary settings too! For more information about delivering workshops check out the makedigital website or the teaching resources at the Scratch edu website


Scratch and Raspberry Pi's


Great example of using ultra low cost computers to inspire young people to code. 

A London primary school got kids from 5 to 11 to learn about coding with Scratch, a fun free programming resource. No reason why this can't be repeated all over the country. Scratch is free to download on an Apple Mac, PC or Linux based computer OS.  

The Raspberry Pi is a £25 computer the size of a credit card. Its so cheap and powerful that it could revolutionise computing in schools!

There is also a downloadable step-by-step resource for teachers to use in class. Check out the article in Wired.

Friday, 20 January 2012

Creating a 3D image using GIMP

3D Thandie with toy Megaphone
You will need a pair of anaglyph glasses - the one's with the red lens for the left eye and a cyan lens for the right eye.


I will talk you through how to turn a digital image into a 3D one! GIMP is an easy to use  powerful free image editing software. You can use Photoshop or any app that lets you edit and recolour you image using layers.


To complete this tutorial, you need to have the latest version of GIMP installed and image to work with (images where the foreground contrasts with the background work best) and a pair of 3D specs.


1. Open up you image in GIMP. 


Note:  Make sure you can see the layers menu, if not go to MENU-WINDOWS-DOCKABLE DIALOGS-LAYERS  move it to the right hand side of the screen for easy access.


2. Duplicate your image so you have two layers  - click on the 'duplicate icon, two small squares overlapping, at the bottom of layers panel next to the green up/down arrows.


3. Select each layer then COLORS - DESATURATE. Make sure you have the 'eye' icon selected to see each layer.


4. Select the top image layer and turn off the bottom image layer eye icon.


5. COLORS - COLOR BALANCE move the top slider towards cyan so it reads -100, we want to make the blue a bit richer so move the middle slider towards Magenta -50.


6. Turn of the blued top layer eye icon and turn on the bottom layer eye icon. The image should still be black and white if not repeat step 3


7. COLORS - COLOR BALANCE move the middle slider towards magenta so it reads -100, again we want to make the colour a bit richer so move the bottom slider towards Yellow so the number reads  -59.


Now here comes the exciting bit!


8. Turn both eye icons on, select the 'move' tool (it looks like a blue cross) from the TOOLBOX palette it should be open, if not go to MENU-WINDOWS-DOCKABLE DIALOGS-TOOLS

9. Select and move your top blue layer to the left slightly - 3 or 5 millimetres - we are trying to recreate the space between your right and left eyes!

10. Put your 3D specs on.

11. Make sure both layer 'eye' icons are showing then move the opacity slider of the BLUE top layer, in the LAYERS menu to about 48.3


12. With your glasses on you should be able to start seeing the 3D effect. You might have to revisit steps 5 and 7 and reapply with cyan and magenta sliders so the colours are richer and brighter. You might have to slightly adjust the top blue image back or forth to get the desired effect! Enlarge your image VIEW-ZOOM- 200% it will look great!


13. Save your work


14. Your image will probaly look best on a monitor or as a high quality colour print.  


You can purchase 3D glasses from Amazon or make your own out of card or recycle some old specs!


Enjoy!

Tuesday, 17 January 2012

The Most Exciting Thing to Happen in 21st Century Education?

The Raspberry Pi computer has the potential to become one of the most important things to happen in 21st Century education and transform they way we teach and do business.


Imagine two secondhand PCs running a VDI (Virtual Desktop Infrastructure) powerful enough to drive several rooms of Raspberry Pi work stations as 'thin clients'. Your £30,000 tri-annual IT spend just dropped to £2,000!


A starting price of $25 puts it firmly in the price bracket of the cash strapped IT heads looking to cost save.


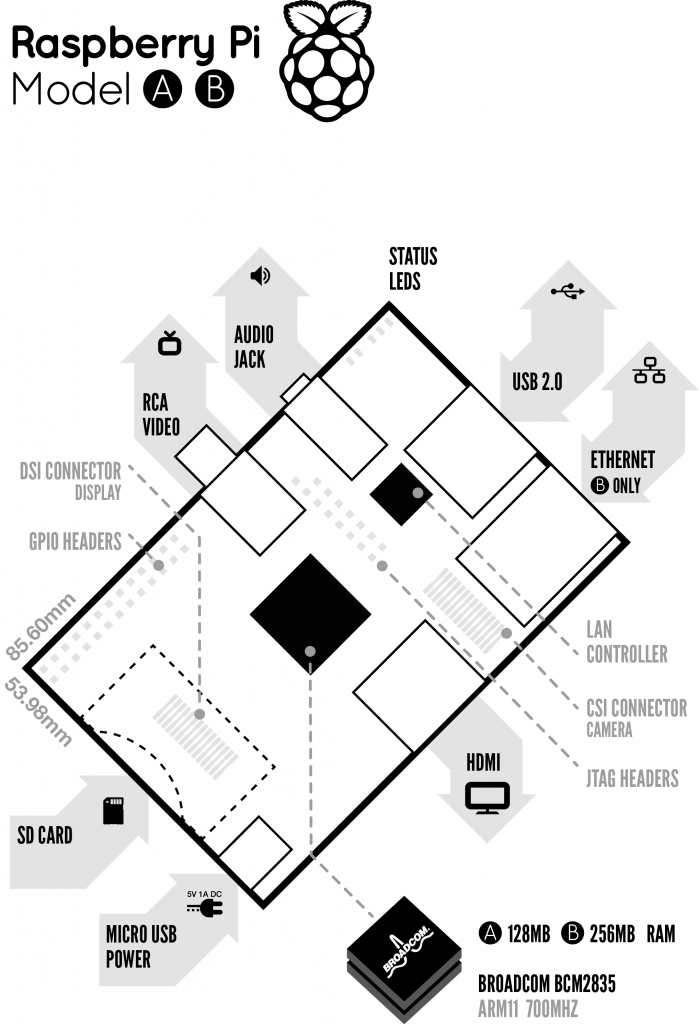
The credit-card sized computer is built by the The Raspberry Pi Foundation (a UK charity with a dream of producing cheap computers for kids) and based on an ARM processing architecture with onboard audio and video outputs and USB, HDMI and SD card slots. Unbelievably, it weights 45 gram and plays High definition video!


This makes it ideal for web surfing and web 2.0 apps, web-design and everyday IT tasks but will struggle with processor intensive applications such as video and sound editing.

Educationalists see the Raspberry Pi as a chance for school's to get pupils into programming - an important skill for this decade.

It comes Linux ready meaning it can access open source software (mostly free) which already offers the productivity of Windows software with very little learning curve - right in line with the Education Secretary's vision of an 'Open Source' future.

The machines specs include a 700MHz ARM11 CPU and 256MB of RAM. It arrives case-less, a barebones circuit board allowing users to personalise the look of their machines. The 'B' model the higher end version, comes with a $35 price tag.

The prospect of 'cheap as chips' (pardon the pun!) computer is a dream for schools, offering the possibility that parents could purchase them buy them for their children just like uniforms, stationary and pen drives, thus relieving heavily stressed budgets  - they are small enough to fit in a primary school book bag or even pencil case!

We could also be at the and the beginning of a truly personalised learning system with children sharing their machines between school and home well, until cheaper tablet computers arrive. 

Schools could enter a fully interactive educational relationship with their children. When pupils connect, teachers could grade and archive work, leaving pupils free to complete course and homework tailored to their learning needs. Pupils can work at their own pace reviewing class lessons using the textbooks and learning materials held on the device or online without clogging up the family computer.

  
Will it be a game changer? Will it usurp the big tech players and take their user base? Will it allow universal computer access for individuals and families in areas of social deprivation - the so called digital divide? If its robust enough to satisfy the wishes of so many users, maybe.

A powerful and capable computer using open software for a fraction of the cost of an Xbox - you can even use your TV as a display. It may become as ubiquitous as game boxes, just add a keyboard and mouse. If your IT suite needs a refresh, you could do a lot worse and purchase a few to run a test network.

We'll find out very soon when the first batch of 'Model B' is released anytime now, whether its a brave new world or same old present, IT lesson time definitely won't be boring!
Saturday, 5 November 2011

Don't Panic...

The above words should be written in large calming letters on all media equipment in the classroom!
Check out this blog for ideas and advice.


It'll make things easier...

Peer to Peer teaching in ICT - Stop Motion Animation

As part of a creative Partnership residency in Derby, we ran a whole school digital storytelling week.  Working in teams pupils wrote storyboard scripts and created mini sets in cardboard boxes!  Each team set-up a digital camera on a tripod and took pictures of action figures/small toys moving around the set. Y4,5,6 helped Y1, 2 and Y3s take pictures. Even Foundation Stage got in on the act! The media specialist students (they had been trained in using ICT creatively by me) were on had to offer advice to teachers and help other pupils!

A great example of year groups working together and sharing skills across the school.


Top Tips;
1. Use a tripod and keep the camera still when taking photos
2. Set you picture quality to no more than 2mega pixels
3. Keep take your Set as still as you can!
4. Taking 50 pictures means 25 seconds of animation
5. You can view your animation in camera
6.You can add titles, music and a narration using editing software. Check out my adding a narration tutorial.
7. If your using the XP version of MovieMaker, in menu- options/advanced - change image duration to 0.5 seconds. Trust me its make thing easier in the long run!
8. Have a play using pine cones/leaves/twigs/etc.to get your animation movements right - you can make them to dance!
9.You can download free music here
10. Make sure you have plenty of light, open curtain/blinds, turn the classroom lights on, point your Set at the window - use your camera flash if you need to.
11. If you have a webcam- stop motion animation is easy! You can save your picture directly to your computer using great free software like Philipp Brendel's Frame by Frame.


Wednesday, 28 September 2011

Anatomy of a Film Project Part 2 - The Story Maker

Story Maker Flow Chart
The Story Maker Flow chart is proving a success! Its designed to help pupils get started and develop their story ideas.
 It is NOT designed to write stories for you. Its for kids with no Ideas.


I mean, common kids! - by the time you are 8 years old you will have seen hundreds of hours of creative content, read books, played games, traveled, experienced life etc. you will have amassed a vast array story making matter which will be floating around in your head.
This flowchart is meant to help you organise free-floating ideas into a narrative that you can turn into a short film, a short story, a book, a multimedia presentation a game, the list is endless! 

Tuesday, 6 September 2011

Free Music, Free Downloads


Do you need music for your movies?

I've composed music for all occassions.

From upbeat melodies to mellow tempo beats. Pop, Rock, Country & Western, funk, Soul Rap and Classical soundtracks .

Its all here you can download as much as you like.
Check out mpfree or freetunes!

Monday, 15 August 2011

Making Maths Fun Part 1

Median average worked out with the whole class.
Here is lessons learned from my work with KS3 Maths students. 


Along with the Maths teacher, I worked with Y7 students to create a series of short films that explored 'Averages'.

Every pupil got involved in presenting a highly visual demonstration of averages! 


The Median, Range, Mode and Mean were all demonstrated by the students. 


Students understanding of Averages  had increased.

Text and graphics added to clarify the results.  

The films created were shown to the rest of the school.

Monday, 8 August 2011

Barnsley Young Apprentice Summer School

Students Rehearsing
Students from Barnsley have completed a Performing Arts and Media Summer School at Sheffield Hallam University.


Key Stage 5 students created showreels and a pop video during professional media training workshops.


The Summer school was all about getting a real world taste of what its like to work in the cultural industries. 


Students; grew in confidence; led their own learning and development; received professional training and improved their readiness for the job market. This was a Barnsley Young Apprenticeship Programme. Maxine Greaves, Equality and Community Engagement Manager at Sheffield Hallam University, hosted the Summer School.

Friday, 22 July 2011

Stories of Chat Moss, Irlam, Salford

The madman of Chat Moss
A Y6 class create films based on the oral histories of people who had lived and worked on Chat Moss, a large area of peat bog on the outskirts of Manchester.


Over 5 days, pupils created a series of films using recorded voices, archive photos, poetry, drama and dance. The films featured bog monsters, scooter riders, rat-catchers and Michael Jackson cameo!


These creative media sessions was part of the 'Stories of Chat Moss Project' funded by Salford Museum.

Friday, 15 July 2011

Creative Partnerships Residency, Derby

A Ghost from a haunted school film 
I've completed an exciting year long Primary school residency, turning pupils and teachers into creative media specialists!


The 'Media Moguls' pupil group cascaded their skills to other pupils and teachers too! After they became confident at podcasting, digital imaging, and using ICT equipment, they  created written user guides and videos.


We worked together on two whole school creative media projects, one involved storytelling using stop motion animation and digital imaging manipulation Alice in Wonderland theme.


A Media Mogul!
I also delivered one to one training with teachers, and worked alongside teacher staff in classrooms. Part of the residency also involved me hosting CPD sessions during INSET days.


Both staff and pupils grew in confidence across a wide range of media, raised achievement and helped to develop a creative curriculum. 


Friday, 1 July 2011

Adding a Narration in Windows Movie Maker XP


1. Plug in your microphone and check that your sound card is working (your system should prompt you)


2. Open Windows MovieMaker


3. Click on the 'Tools' Menu , then 'Narrate timeline'.


4. Check 'Front Microphone' from the Microphone drop down menu


5. Click 'Start Narration' and speak into your microphone.


6. When finished click 'Stop Narration'.


7. Press the play button to listen to your narration 


Check out Adding A Narration to Your Movie for more help.

Thursday, 16 June 2011

Free Software - GIMP

GIMP, meaning 'GNU Image Manipulation Program' is free digital imaging software that's a lot like Adobe Photoshop.


You can do all the basic stuff like image cropping, resizing, brighten/darken, changing exposure, saturate desaturate, adding text etc.


However, its the filters and the layering system that allows you to really go to town on your digital photos!


I've done a brief video tutorial on how to use layers in GIMP to replace backgrounds here.

Its free to download from the GIMP website

Monday, 13 June 2011

Creative Partnerships Residency, Halifax

Can you be creative in teaching Maths? Yes you can!
Y7, Y8 and Y9 pupils and their Maths teacher were transformed into media makers at a secondary school in Halifax. I helped them 'become' numbers - 'become' maths, as they solved problems through filmmaking and role play!
Pupils learning was transformed, they increased their understanding of probability, averages and improper equations.

Saturday, 4 June 2011

From Primary to University!


Sheffield Hallam University

I've just completed a project that used a creative approach to encouraging Primary school pupils to consider going to University!

I involved a class of Y6 pupils from Barnsley in role-play games and video making aimed at exploring thoughts and feelings  about being in the grown-up space of a big City University.

Pupils created designs for their perfect classroom and had chance to edit some of the video they had shot. A fun time was had by pupils and teachers. They all received a DVD memento of their experience. Maxine Greaves, Equality and Community Engagement Manager at Sheffield Hallam University hosted the event.