You awoke this morning with a burning desire to place an animated version of yourself in a Scratch games ... well this tutorial is for you!
 |
| The Scratch version 1.4 Interface |
You animate sprites in Scratch by changing the sprites costumes, this means that you will have to take several photos of your subject in different poses. The process is a bit like taking photos for stop motion animation.
Lets go through a list of things you need to do to successfully create your own sprites. This tutorial assumes you know how to animate sprites in scratch.
1. Taking Your Pictures
You need a digital camera - a tripod is helpful but not essential.
A webcam connected to a computer is a good solution.
If you are pretty confident using video, you can film your subjects poses and grab still images from the video.
You can take take as many pictures as you like but lets keep it to a manageable 3.
 |
| A webcam will transfer yours picture directly to your computer and there's no need for a tripod. |
2. Image size.
Keep you images small.
Set your image resolution/size to 480 x 360 pixels or 640 x 480 or about 1 mb in size.
3. The Pose
For inspiration check out some of the poses in the Scratch people library!
Keep your subject in the centre of the frame to get a smooth animation.
Use a green screen or a plain backdrop that contrasts against your subject.
5. Editing your Pictures
Use an image editor to erase your background.
You can use programmes like Corel Paintshop Pro or Adobe Photoshop. You can also use free image editors like GIMP or Pixlr.com.
You can use programmes like Corel Paintshop Pro or Adobe Photoshop. You can also use free image editors like GIMP or Pixlr.com.
 |
| You should see a checkerboard pattern after you take away your background |
Name your files sequentially; e.g., image1, image2, image3 then save as a .GIF or PNG file format.
6. Now lets open Scratch!
Open image1.png as a new sprite then import the rest of your images - select costumes tab - import.
6. Now lets open Scratch!
Open image1.png as a new sprite then import the rest of your images - select costumes tab - import.
 |
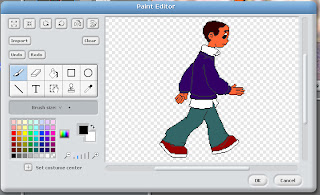
| You can also use the image editor in Scratch to remove backgrounds from your sprite. |


No comments:
Post a Comment